Decoding the Drivetrain: Simple Tests to Determine Car Battery Health
A healthy car battery is the unsung hero of your vehicle. It’s the silent partner that delivers the initial jolt to start your engine, powers your lights, and keeps all your electrical components humming. But like any component, a car battery deteriorates over time. Knowing how to assess its health is crucial for preventing unexpected breakdowns and saving money on costly repairs. This guide provides you with simple, effective methods for checking car battery health right in your driveway, empowering you to diagnose low voltage issues and stay on top of preventative maintenance.
Understanding Car Battery Voltage: The Key to Diagnosis
Before diving into testing, it's essential to grasp the correct voltage ranges for a 12V car battery under different conditions. This knowledge acts as the benchmark against which you’ll measure your battery’s performance.
Resting Voltage (Engine Off): A fully charged 12V battery should read between 12.6 and
12.8 volts when the engine is off and the car has been sitting for at least a few hours. A reading below
12.4 volts indicates a partially discharged battery, and anything below
12.0 volts suggests significant discharge and potential sulfation (a build-up of lead sulfate crystals that reduces battery capacity).
Voltage During Starting: When you crank the engine, the battery voltage will temporarily drop. A healthy battery should maintain a voltage above 9.6 volts during this process. A drop below this level signifies that the battery is struggling to provide sufficient current for starting and might be nearing the end of its life. Frequent drops below
9.6 volts can also point to a faulty starter motor drawing excessive current.
Voltage While Running (Charging): With the engine running, the alternator takes over to power the electrical system and recharge the battery. Expect a voltage reading between 13.7 and
14.7 volts in this state. If the voltage is significantly lower or higher, it could indicate a problem with the alternator or voltage regulator. Overcharging can be just as damaging as undercharging.
Step-by-Step: Testing a 12V Car Battery with a Multimeter
A multimeter is your primary tool for performing a basic car battery voltage test. It's an inexpensive and versatile device that allows you to measure voltage, current, and resistance. Here’s how to use it for car battery diagnostics:Safety First: Before beginning any electrical work on your car, always wear safety glasses and gloves. Ensure the vehicle is parked on a level surface and the parking brake is engaged.
Step 1: Gather Your Supplies
Multimeter (digital is recommended for ease of reading)
Safety glasses
Gloves
Clean rag or brush to clean battery terminals (if necessary)
Step 2: Prepare the Battery
Open the hood and locate the car battery.
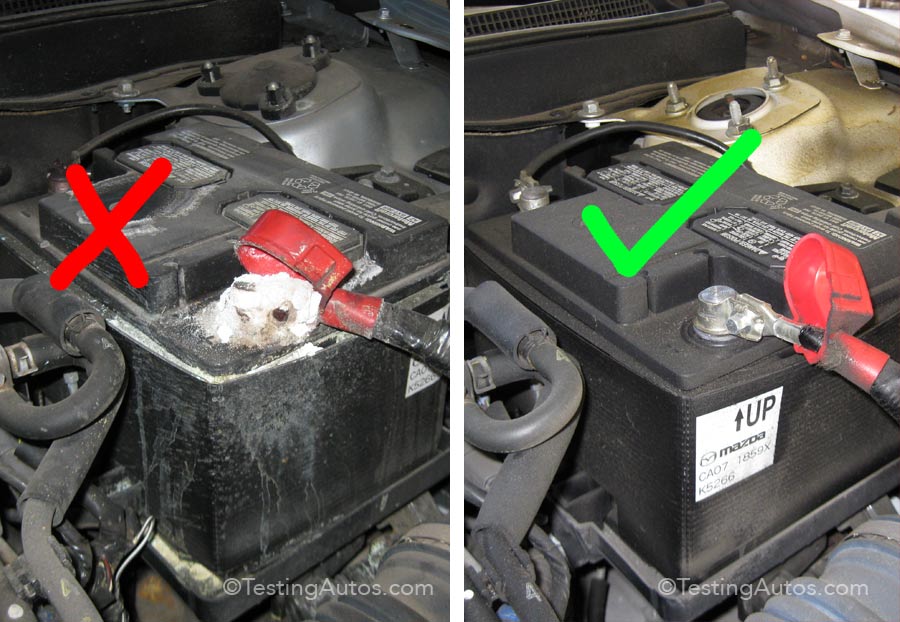
Visually inspect the battery terminals for corrosion or damage. Clean them with a battery terminal cleaner or a mixture of baking soda and water if necessary. A clean connection is crucial for accurate readings.
Step 3: Set Up the Multimeter
Turn on the multimeter.
Set the multimeter to DC voltage (DCV) mode. Select a range that is slightly higher than the expected voltage (e.g., 20V if your multimeter doesn't auto-range).
Step 4: Connect the Multimeter
Identify the positive (+) and negative (-) terminals on the battery.
Connect the red (positive) lead of the multimeter to the positive terminal of the battery.
Connect the black (negative) lead of the multimeter to the negative terminal of the battery.
Step 5: Read the Voltage
Observe the voltage reading on the multimeter display.
Record the voltage reading. This is your resting voltage.
Step 6: Starting Voltage Test (Optional)
Have a helper crank the engine while you observe the multimeter reading.
Note the lowest voltage the multimeter displays during cranking.
Step 7: Running Voltage Test (Optional)
Start the engine and let it idle.
Observe the multimeter reading. This is your charging voltage.
Step 8: Interpret Your Results
Compare your voltage readings to the expected ranges mentioned earlier. Use a car battery voltage chart for quick reference.
The Importance of Load Testing: Beyond Voltage Readings
While a voltage test provides a snapshot of the battery's charge level, it doesn't reveal its ability to deliver sustained power under load. A load test simulates the demands of starting the engine by drawing a significant amount of current from the battery. This reveals the battery's ability to maintain voltage under stress.
Professional load testers are available at auto parts stores like Auto Zone and O’Reilly. These devices apply a specific load to the battery and measure the voltage drop. A healthy battery will maintain a reasonable voltage level during the test, while a weak or failing battery will experience a significant drop. Many auto parts stores offer free battery check services that include load testing.
Early Warning Signs: Recognizing a Weak or Failing Battery
Detecting a failing battery early can save you from being stranded. Pay attention to these common signs: Slow Engine Cranking: This is one of the most obvious symptoms. The engine takes longer than usual to start. Dim Headlights or Interior Lights: A weak battery struggles to provide adequate power to the vehicle's electrical system, resulting in dim lights. Clicking Sound When Starting: This indicates that the starter motor is not receiving enough power to engage the engine. Electrical Issues: Intermittent problems with the radio, power windows, or other electrical accessories can be a sign of a failing battery. Swollen Battery Case: Extreme temperatures or overcharging can cause the battery case to swell or bulge. This is a serious issue and requires immediate replacement. Check Engine Light: In some cases, a low battery voltage can trigger the check engine light.
Recharge or Replace? Knowing the Difference
If your battery voltage is low, the first step is to try recharging it using a battery charger. A slow, controlled charge is gentler on the battery than a high-speed charge. If the battery fully recharges and holds its voltage, it may be salvageable. However, if the battery refuses to hold a charge or fails a load test after being fully charged, it’s time for a replacement. Continuing to use a weak battery can put undue stress on the alternator and other electrical components.
Common Mistakes to Avoid When Testing or Charging a Car Battery
Incorrect Polarity: Always double-check the polarity before connecting the multimeter or battery charger. Reversing the connections can damage the equipment and potentially the battery. Ignoring Corrosion: Clean battery terminals are essential for accurate readings and efficient charging. Overcharging: Overcharging can damage the battery and shorten its lifespan. Use a charger with automatic shut-off or monitor the charging process closely. Using a Charger with the Wrong Voltage: Ensure the charger is compatible with a 12V battery. Testing Immediately After Driving:Allow the battery to rest for at least a few hours before testing to get an accurate resting voltage reading.
The Benefits of Regular Battery Checks
Regularly checking your car battery health offers several advantages: Prevent Unexpected Breakdowns: Identifying a weak battery early allows you to replace it before it fails unexpectedly. Extend Battery Life: Proper maintenance, including periodic charging, can help extend the lifespan of your battery. Save Money on Repairs: A failing battery can put stress on the alternator, potentially leading to premature failure. Replacing a battery is often cheaper than replacing both the battery and the alternator. Ensure Vehicle Reliability: A healthy battery contributes to the overall reliability of your vehicle, giving you peace of mind on the road.
The Future of Car Batteries: AGM, Lithium, and Smart Monitoring
The automotive industry is constantly evolving, and battery technology is no exception. Absorbed Glass Mat (AGM) batteries offer improved performance and durability compared to traditional flooded lead-acid batteries. Lithium-ion batteries are even lighter and more powerful but come at a higher cost. "Smart" batteries with built-in monitoring systems are also emerging, providing real-time data on battery health and performance.
Conclusion: Empowering You to Maintain Your Car's Electrical Heart
Understanding how to tell if a car battery is bad is a valuable skill for any car owner. By following the simple tests outlined in this guide, you can proactively monitor your battery’s health, prevent breakdowns, and extend its lifespan. Remember to prioritize safety, use the correct tools, and interpret your results carefully. Regular battery checks are a small investment that can pay off big in terms of reliability and peace of mind. Don't hesitate to take advantage of free battery check services at your local auto parts store for a more comprehensive assessment. Your car's electrical system will thank you!